I easily installed the system on my wife’s SUV, Nissan Rogue, without any issues. I mounted the front camera behind the rear-view mirror so it is out of the way and out of sight. The rear camera was installed on the back window using the supplied 3M double sided tape. It ended up coming down after a couple of days so I super glued it to the tape that was still attached to right above the window.
My new truck was about the same for the front window. The only issue with the back is the bed of the truck. I wanted to place the camera above my license plate to get the best view possible. Two issues arose.
The first was the supplied cabling for the rear camera was too short to route from the front camera to the back. Instead of splicing a cable together I ordered their extension cable (https://amzn.to/2BT8zWE). For the attachment to the license plate I decided not to look for solutions and create one.
The Build
First I took the measurements off an old license plate to get the dimensions for the bracket. The first measurement was the distance between each hole to mount the bracket. It measure around 177mm from center point to center point. I used the sketch feature in Fusion 360 to create the profile.
The first measurement was from center hole to center hole of the screw slots (177 mm).
Once i had these dimensions, I could settle on a design for the bracket. I wanted it to be offset to show the entire tag when viewed. So I offset the screw holds from the main bracket. I first made the boxes and use the fillet tool to curve the bottoms. I created a circle in the middle of each box to form the holes for the bracket. From there I made the top of the bracket using the square tool and created a rectangle that was about 12.5mm from the edge of the first two boxes. That made the total length about 234mm. The width was 30mm. Once it was drawn, I deleted the center line to create the offset.
Second measurement was the total length of the part I wanted to make (~235 mm)
All that was require next was the holes to mount the camera. I measured the bracket for the camera and it came out to be 32mm from center point to center point. So I got the midpoint of the bracket so far and drew a construction line for reference. I then created two circles that were 16mm from each side of the midpoint reference (construction) line.
Next was to position the camera mounting holes in the center of the piece (~117.5 mm) and ensure that they were 32 mm apart.
With that completed the bracket was ready to be extruded into three dimensions to print on the 3D printer. Prior to printing, I came up with an idea of how to secure the camera within the bracket itself with a nut. Once I extruded the sketch, I created a sketch on the top plane of the bracket. This allowed me to create a two dimension sketch to then cut away a pocket for both nuts.
The two nut pockets can be seen above to capture two M3
After that it was ready for printing. I used my only 3D printer the Creality Ender 3 (https://amzn.to/2NjEIMy). The setting will be below. Here are some of the pictures of the bracket installed. It worked perfectly. If you have any comments, please leave them below.
Final Product
Printed and in place!
The final product turned out great. Only time will tell on how long the PLA last in the dry Texas heat.
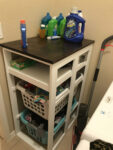
After recently moving into a smaller house, organization has been a necessity to ensure we can keep a clean and neat home. One of those organization projects was to organize our laundry room due its small space with zero storage. No where to place our detergents or laundry baskets. So the problem had to be solved, which is great giving me the excuse to do some woodworking while keeping my wife happy! Win-win!
For this project, I will be walking through the steps of designing and building a laundry basket holder with shelves to accommodate our storage requirements, while keeping it organized.
Design & Requirements
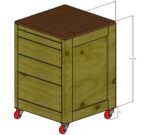
The requirements for this project are dependent on the necessity. Our laundry room is a very small room with barely enough room for a small metal shelf and a laundry basket. So I started brainstorming on the solution. My brother-in-law has a fairly large laundry room and built a floor to ceiling laundry basket holder to separate clothing. This helped with the inspiration of my design along with some quick internet searches for other designs. Check out Ana White’s design that follows a similar design that I drafted. My requirements were that it holds at least two baskets, provides at least one shelve for storage, and fits within my limited space.
First I hand draw my projects. Then I use Sketchup to make a more precise cut list.
My first design (hint..hint) was to hold three baskets and one shelve on the top. I first sketched the design in my project notebook to get a rough idea of the look and the proportions. I feel like this is a fast and easy way to bring an idea from mind to reality without having to worry about the exact dimensions. After I got the general sketch, I took dimensions of my laundry baskets and of the area that the shelving would go. This help bring scale to my drawing while still keeping it simple.
Once I got the initial design sketched out with rough dimensions, I turned to my computer to determine the exact dimensions to develop my material list and cut list. Doing this before cutting or purchasing the material helps save time and money! This also helps with proportions of the overall project.
First design.
Gathering Project Materials
After getting my material list prepared on the computer, a quick run to the home store is required to gather the materials and consumables. Some of the materials and tools can be substituted depending on tool availability. For example, mending plates and L-brackets can replace the pocket holes to assemble the frame. I used the mending plates in one portion of my frame due to a mistake in the fabrication process (See below for an example picture).
Coffee is a must!
Below are the materials and tools required to complete this project.
Using the cut list from Sketchup, I cut the frame and support members from those three boards. First, I cut all the stock down to rough dimensions on the miter saw to make it easier to cut on the table saw. Then I cut them to width on the table saw to 2 1/2 inches.
Cut list for the project.
The boards that I bought from the home store were discounted due to damage and warping. To mitigate bowing of the frames, I used my table saw to edge joint the boards. I learned this method from Jimmy Diresta after watching his “Ask this Old House” YouTube video.
Discount Lumber from the Home Store
The method to joint the edges of the board on the table saw is to flip the piece of wood during each cut to slowly reduce the amount of unevenness of the edge until the edge is square. While cutting the boards the goal is to take off a little at a time to reduce the amount of waste of each board. This worked better than I thought. As you can see from the pictures above it eliminated the gap completely from my top shelve. Quite a difference.
Before
After
After the edges were straight enough, I cut all frame stiles, rails, and support members to size on the table saw and miter saw.
Lumber was cut per the cut list.
Tip #2: If you don’t own a table saw, you can by dimensional lumber in the correct widths at the home store. This will alleviate the need for a table saw to rip the pieces to size. All that would be required is to cut the pieces to length on a miter saw or circular saw. Just ensure the boards are not warped along the length.
Cut List:
Frames
Four (4) 3/4″x2.5″x43″ pine boards (Outside Stiles)
Four (4) 3/4″x2.5″x23″ pine boards (Rails)
Two (2) 3/4″x2.5″x38″ pine boards (Inside Stiles)
Horizontal Support Members
Four (4) 3/4″x2.5″x18″ (horizontal support members)
Assembling the Frames & Design Confirmation
Once the boards were cut to final size, I began assembling the left and right frames that will be the main structure of the laundry basket cabinet.
Mending Plates
Pocket Holes
The primary means of assembling the rails (horizontal members) and stiles (vertical members) were by pocket hole screws. I used the Kreg Pocket Hole Jig to create the pockets on all the rails and the middle stile. This worked fairly easily. However, one frames middle stile didn’t take the screws very well. So, to fix the issue I used a mending plate to attach the middle stile (See picture above). You can use mending plate to attach the entire frame assembly instead of using pocket holes.
Finished the rails and stiles for each side.
After the basic frames were constructed, I assembled the whole cabinet to verify the position of each laundry basket shelf and the top shelve. I used clamps to hold everything in place to show my wife and get the approval to continue.
Test Fit with Clamps.
Her strong recommendation was to eliminate the top laundry basket shelve and replace with a normal shelf for more storage. So I redesigned the cabinet to account for the secondary shelve. I took measurements of the location of each shelving rail and dissembled the cabinet to secure the shelving rails to the frames.
Finished the sides with the rails for the baskets and shelf.
Tip #3: If you don’t have a pocket hole jig or don’t want to purchase one, mending plates can be used to assemble the side frames and L-brackets can be used to assembly the side frames to the horizontal support members on the top and bottom.
Preparing for Finishing
After completely assembling the the side frames with the shelve railing in place, I filled all the pocket holes with wooden dowels and a few pocket hole plugs. This will hide the construction techniques and make it look more professional. I also filled the screw holes and any imperfections with wood filler to hide all the screws and defects in the wood. Once everything dried, I flush cut all the wooden dowels and sanded down both frames to prepare for finishing.
Filling Pocket Holes with Dowels
Filled the Defects with Wood Putty
Filled the Screw Holes with Wood Putty
Before Sanding (Left) & After Sanding (Right)
I first used 100 grit sand paper to remove the bulk of the high spots and left over material from the wood dowels and wood filler. After that was completed I used 150 to make everything smooth. Now the frames and top are ready for finishing.
Final Assembly & Finishing
Now that everything is ready to be painted, I assembled everything today except the top. This ensures that the glue bonds to the horizontal support members and makes painting easier. Since the base of the cabinet will be painted white, I applied the first coat of paint and let set for a couple of hours until it was completely dry. Then I lightly sanded with 220 to remove any high spots and bubbles in the paint. Make sure you wipe the area with a clean rag to remove any dust and debris from the cabinet. I applied two additional coats of paint to ensure the durability of the paint was adequate for its use.
Painted & Stained
For the top, I ensured all dust and debris was removed from the surface and applied a sanding sealer to ensure the stain would be applied evenly throughout the wood. This gives the wood stain a consistent color throughout the wood grain. I applied two coats to get the desired color, sanding between each coat. After the stain completely dried, I applied wipe-on polyurethane to make the wood shine and apply some protection. You can substitute with wood polish for a little less protection but easier application.
I am on a quest to build my own Computer Numeric Control (CNC) Machine. It has been a pursuit of mine for the last three years. I have attempted on some machines only to get to a hurdle that I just give up. However, it is my only priority for the next few months.
To start things off, I am building a dedicated stand as a base for my CNC machine, which will be the Mostly Printed CNC by V1 Engineering. Click the link for information about this machine.
Overall Design
The Design
The design of this tool cabinet will be using 2x4s and plywood for a cost effective project for shop furniture. The 2x4s will be used to make the side panels using rails and stiles with a plywood inset. Then 4 stretchers will be used to connect the two side panels together to create the basic cabinet. Once built the cabinet drawers will be made and placed. My design calls for four main drawers (Two medium and two large). It also has a bits tray at the very top to store…well bits for the CNC.
The Build: Side Panels
To start this build the side panels need to be made since there are the major of the cabinet frame. I bought 2x4s from my local home store. While picking my stock at the store I was looking for the straights and tightest grain I could find. The tighter the rings on the wood the stronger the wood will be.
First, I cut down the 2x4s to get to the rough dimensions required for my plan. I cut it about an inch or two long. This is to account for any human error at this point or possible snipe once I start planing down the material.
Measuring the stock
Getting ready to plane down
After Planing
Planing down the edges on the table saw
Side Panel Rails and Stiles
After all the 2x4s are cut down to a rough size, I planed down the 2x4s to get rid of the rough sides and rounded edges. This step is completely optional and does not add any strength or benefit in the final product besides cleaning up the face of the wood.