The plan for Monday was an open water swim session. However, I haven’t been swimming for long and turned this session into a pool swim at my university. In this session, I focused on my technique instead of distance. Since I haven’t swum regularly in the past few years, the focus is to get comfortable in the water and improve my breathing technique. The gear I have been using is just an ordinary pair of swim trunks and swim goggles. The university has paddles and kickboards that are free to use, and I did a few laps with each of them to improve my form and practice my leg kicks. Since I have started swimming, my leg kicks have always been the weakest portion of my swimming. I like to use my upper body to swim!
The actual workout was 200 meters of freestyle swimming followed by 200 meters laps repeated twice. Then a cool down swim of 200 meters mixed swimming (i.e. any stroke) this is the point I used the paddles and kickboard. This workout totals to 1000 meters of swimming.
Key Learning Points:
1. Slow swimming helps improve form and increases distance with less fatigue
2. I need to improve my swimming kicks
So, I’m not sure how I want to do my updates for my triathlon training. For now, I am going to post daily or close to daily training updates. Bear with me as I try to figure out the best way to structure these updates. This is the first week I’m posting my training sessions, but it is the 4th week of my training. That explains why my training day begin on day 21 instead of day 1.
I started the week with a brick session on Sunday. A brick is two back-to-back workouts. This is to train for the transition that occurs in a triathlon. I started with an 8.9-kilometer bike ride around my local area and then moved to a 3-kilometer run. I learned a lot from this training day.
During my bike ride, I noticed that shifting to my lower gears during steep hill climbs resulted in my chain skipping and the chain rubbing on the derailers. The last time I got the bike tuned has been at least four years (mainly because I haven’t ridden consistently since 2014). After the bike ride, I changed my cycling shorts for pair of running shorts and shoes because I didn’t own any tri-shorts to practice the transition. This type of transition made my workout a bit long and unrealistic. It took me about 5-7 minutes to change, and my running motivation began to wane. Nevertheless, I pushed through this inconvenience and completed the 3k run. The run felt ok; I didn’t push myself too hard and focused on the feeling of my legs to get a baseline of my performance.
Key Learning Points:
A tuned Bike is vital to maximizing performance.
Tri-shorts are essential gear for training.
Practicing the bike to run transition to get familiar with your performance
I started this section of my blog as a timeline for my training for my first Triathlon. Competing in a Triathlon has been a goal of mine for the last seven years. However, due to many unforeseen circumstances and ever-growing work requirements, I haven’t been able to compete in a triathlon. Now I am at a point in my professional career that I now have a little bit of free time to train again. So, I am currently training for the Sandling Beach Triathlon held in North Carolina at the beginning of October!
To start this blog series, I have recapped how I became interested in the sport of Triathlons and how I got to this point. If you aren’t interested in my story below, no hard feelings, and take a look at my latest post!
The Beginning
It started when I was learning how to fly helicopters in Enterprise, Alabama. The local Army base was hosting a Sprint Triathlon in the Fall of 2014. So my friend and I started to train for the event a couple of months out. I bought my bike, which was a Trek 1.1 road bike, in 2013, and we hit the pool about twice a week.
However, due to work requirements, we were unable to compete. The goal of completing a Triathlon was still in my sights. Unfortunately, my new work requirements began to pile up, and my responsibilities as an adult did not leave much time for triathlon training. In 2015, I was given another opportunity to compete in a Reserve Sprint Triathlon in South Korea. The timing and structure of the course were perfect. A reserve triathlon is a run, bike, and swim. Whereas a traditional triathlon is a swim, bike, and run. The night of the Triathlon, I gathered all my gear near the door and excitedly tried to sleep!
Around 1 AM, I was abruptly awoken by the phone going off. My supervisor informed me that one of my subordinates was picked up by the police and hospitalized for alcohol poisoning. As the manager, my weekend was ruined by ensuring he was in good health and completing a mountain of paperwork. Once again, another triathlon attempt was foiled by unforeseen circumstances.
At this point, my hopes for completing a triathlon was dwindling, and my motivation was waning. However, during my work performance reviews, I always put completing a triathlon as one of my personal goals. Fast forward to today, I am currently in a position where my free time has dramatically increased, and my motivation to compete in the upcoming Sandling Beach Triathlon is at an all-time high!
As of writing this article, I have been training steadily for about three weeks. My fitness is not where it was seven years ago, but I think that will be the best part of the challenge to get back to the point I was fitness-wise.
This series will chronicle my journey through training, dieting, and finally completing a triathlon!
The world is constantly changing with the development of new technology. This is especially true with unmanned systems and supporting technology. There have been many successful implementations of unmanned systems in recent years for drones, self-driving cars, and automated vessels. This article is going to review the successful implementation of unmanned maritime vessels and the legal aspects of these systems.
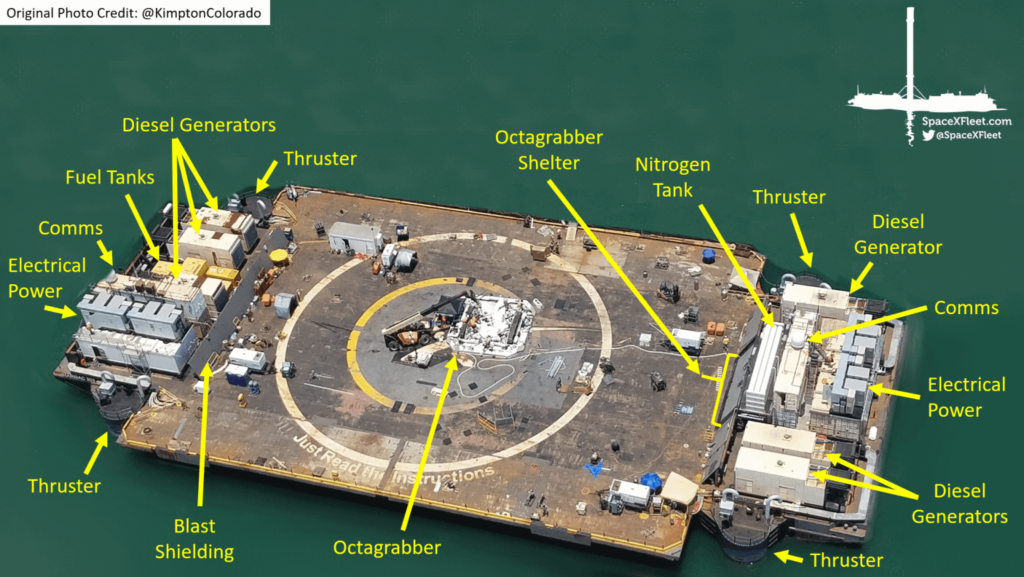
SpaceX is known for its development of reusable rocket systems to reduce costs and make space travel more efficient for a future mission to deep space. These drone ships are autonomous and have many different capabilities that can be used remotely during the recovery of a rocket booster. The drone ships are not designed to move over long distances but are tugged to a location where they will adjust in short distances for the landing position of the rocket. The drone ships have firefighting capabilities, a robot to secure the rocket and a thruster to stabilize the ship (SpaceX Fleet, 2020).
Figure 1. Just Read the Instructions Layout (SpaceX Fleet, 2020)
The SpaceX drone ship is only one successful implementation of an autonomous ship. There are many more for research and development and country defense. The only problems with unmanned vessels are the legalities of their operation and usage. Maritime laws that have been established have been focused on manned vessels and not the classification of unmanned systems (Norris, 2013). There are many debates on how to classify unmanned vessels. There are some thoughts that they should be classified as mines if they are tethered or immobile. Some thoughts are that there should be new classifications to cover all unmanned vessels (Delgado, 2018). Another topic of discussion is the navigational implications of their usage at sea. The navigational rights for ships clear for innocent, transit, and archipelagic sea lanes passage. However, these laws apply to manned ships (Delgado, 2018).
The classification of unmanned vessels is still up for debate and the need for classification is required before any other application to maritime laws can be applied. Classifying an unmanned vessel as a ship will apply the current maritime laws to the ship. The issue is the liability of the operator for the vessels. To date, there has not been a classification of unmanned vessels within the maritime laws (Norris, 2013). So, their responsibility and liability are lagging that of manned vessels. This is like the lagging of unmanned aerial vehicles for the Federal Aviation Administration.
The other topic of navigational rights is also in question. Maritime laws have three different rights of passage for vessels. These rights apply to manned ships, but it is unknown if unmanned ships can follow these same rights. The first right is the right of innocent passage. This right gives “ships of all states” the ability to navigate within the territorial sea of a coastal state (Norris, 2013). The second right is the right of transit passage. This allows ships and aircraft to transit through straights and overflight where the destination is another state. The last right is the archipelagic sea lane. The sea lanes are created by multiple states and all ships and aircraft can operate within these lanes (Norris, 2013).
By reviewing the navigation rights of maritime laws, it is easy to recognize the importance of classifying unmanned vessels or create a new classification to better fit the current laws that govern the seas. With the lack of classification, there is no clear answer to what unmanned vessels can do and their actions can be construed by each state. Unmanned maritime vessels will continue to be implemented for Navies, countries, and companies, so the need for these laws to be updated or applied are necessary for continued globalization.
References
Delgado, J. P. (2018). The Legal Challenges of Unmanned Ships in the Private Maritime Law: What Laws Would You Change? maritime, Port and Transport Law between Legacies of the Past and Modernization, 493-524.
Norris, A. (2013). Legal Issues Relating to Unmanned Maritime Systems Monograph. U.S. Naval War College.
SpaceX Fleet. (2020). Just Read the Instructions. Retrieved from SpaceX Fleet: https://spacexfleet.com/just-read-the-instructions
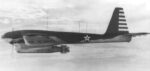
The military has employed drones in military operations since World War II. In World War II, the United States Navy primarily used these drones for target practice. However, the United States Navy invested in a twin-engine optionally manned bomber aircraft. The technology at the time was primitive for radio control and the unmanned aerial vehicle used a television camera and signals to view and control the aircraft. This aircraft was called the TDR-1 (Mizokami, 2017).
Figure 1. (Mizokami, 2017)
Now unmanned operations have been very appetizing to the United States and Foreign Militaries because the practical applications of unmanned vehicles reduce the risk of loss of human life. The technological advancements of wireless technologies, global positioning systems, and aircraft systems have led to more advantageous and affordable options for high-risk missions rather than using humans that could be exploited or killed during the mission. A journal article, “Unmanned Aerial Vehicles in the Navy: Its Benefits” (2016) by the Portuguese Navy outlined the benefits of utilizing unmanned aerial vehicles in combat operations. The article explores various topics that will be explained in this blog post.
There are some direct benefits to using Unmanned Aerial Vehicles over their human counterparts is training requirements, material loss, human physiology, and cost. To being, humans require an intensive amount of training to complete certain tasks or complete a specific mission (Rosa, Marques, & Lobo, 2016). This training is very time-intensive and costly. Humans that are recruited to complete these types of training can also become injured or killed. This is very financially impactful to the militaries and their training programs. For the United States Navy Seals it cost over $500,000 to train one Navy Seal and around 2.5 years to complete the training without any repeats (Gaskell, 2009).
Human loss versus material loss is an important aspect of the benefits of unmanned aerial systems. The destruction of a machine or robot is a financial burden that can be replaced or repaired. During high-risk missions, like intelligence, surveillance, and reconnaissance (ISR), the loss of human life outweighs some of the benefits of the intelligence that is gathered. If a human is captured and killed, the impact is far greater than the destruction of a machine. The human may have family obligations that would be impacted by the loss of a loved one. Their loved ones could never be replaced in this event (Rosa, Marques, & Lobo, 2016).
Material loss when compared to human life is far less impactful. Material exploration could happen with the loss of some proprietary information however only a limited amount of information may be lost. Humans contain far more information to be exploited that could compromise other missions or human lives (Rosa, Marques, & Lobo, 2016).
Another added benefit of unmanned systems is the lack of physiological needs that are required by humans. UAVs or UVs only need power and limited connectivity to complete their tasks or missions. UVs do not need to eat or sleep and they are not greatly affected by temperature. These capabilities make them or viable options for long-duration surveillance or missions that require multiday or multi-month operations.
Figure 2. (Rosa, Marques, & Lobo, 2016)
While the cost of UVs can be significantly more than some human training, the human cost of life will outweigh some of the cost of unmanned systems. The ease of replacing a UAV on the battlefield is far easier and less time consuming than replacing a trained Sailor, Airmen, or Soldier with the same level of experience and skill. These benefits have made unmanned vehicles very attractive to all militaries across the world and will continue to be developed and implemented to ease the burden of the death of human lives.
I would have to agree with the journal article by the Portuguese Naval Academy, that unmanned aerial vehicles are better for high-risk missions, specifically the intelligence, surveillance, and reconnaissance (ISR) along with some aerial combat operations. These systems allow longer duration flights without the need for human physiology needs to sleep and eat. Also, the training cost to prepare pilots, operators, or Sailors can be outweighed and outperformed by UAVs. As technology increases with these systems their application to save human lives and obtain required information without the risk of exploitation will replace the human aspects of the battlefield and how wars are fought.
References
Gaskell, S. (2009, April 14). Three Navy SEALS freed Capt. Phillips from pirates with simultaneous shots from 100 feet away. Retrieved from New York Daily News: https://www.nydailynews.com/news/world/navy-seals-freed-capt-phillips-pirates-simultaneous-shots-100-feet-article-1.360392
Mizokami, K. (2017, September 21). The Forgotten Drone of WWII. Retrieved from Popular Mechanics: https://www.popularmechanics.com/military/aviation/a28312/wwii-drone-strike-tdr-1/
Rosa, G. C., Marques, M. M., & Lobo, V. (2016). Unmanned Aerial Vehicle in the Navy: Its Benefit. “Mircea cel Batran” Naval Academy Scientific Bulletin, 39-43.
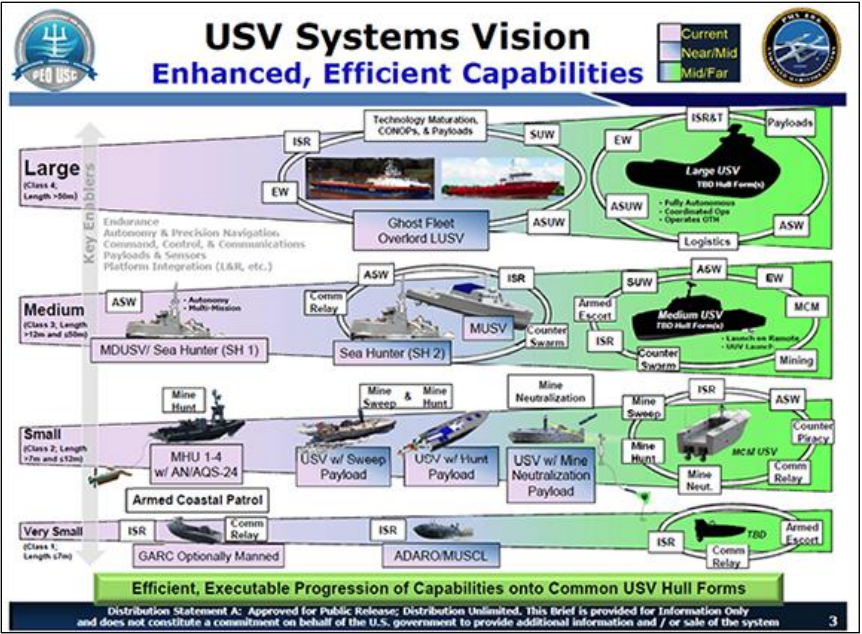
The United States Navy has invested in numerous autonomous maritime vehicles throughout the years and plans on extending its capabilities to a larger scale. The Navy requested $579.9 million for FY21 to fund three different categories of the unmanned vehicles. These categories are defined as Large Unmanned Surface Vehicles (LUSV), Medium Unmanned Surface Vehicles (MUSV), and Extra-large Unmanned Undersea Vehicles (XLUUV) (O’Rourke, 2020).
Figure 1. (O’Rourke, 2020)
The capabilities of each of these categories of maritime systems would be used to help retain the United States Naval capabilities while Chinese naval spending increases (Larter, 2020). As the Navy begins to look at more and more unmanned capabilities the organization would have to change the structure of the Naval Force. Currently, the architecture the Navy uses is for large scale manned operations and vehicles with small unmanned systems for sub-hunting and mapping. However, this change in larger-scale unmanned systems would require the organization to change its command and control platforms and procedures (Larter, 2020).
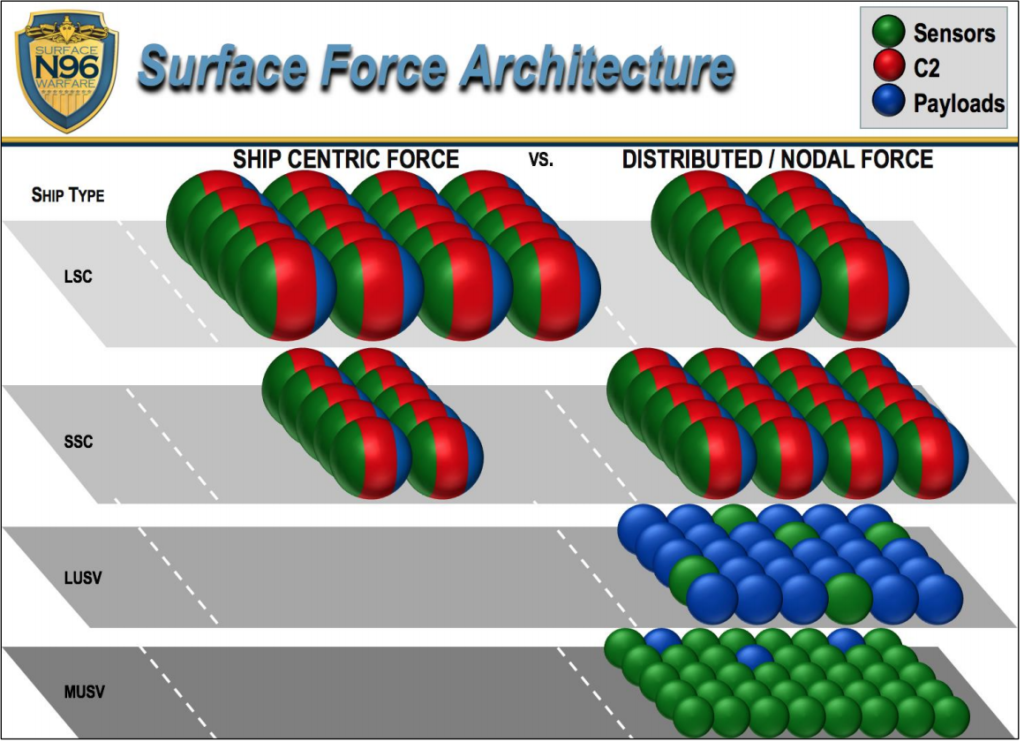
The figure below is a visual representation of the difference for the current ship-centric force and the distributed / nodal force that the Navy would use with more unmanned maritime systems (O’Rourke, 2020).
Figure 2. (O’Rourke, 2020)
The movement to a more distributed force has been difficult to obtain due to the technology gap. However, with new advancements with underwater communications and artificial intelligence.
Underwater communications with ships and submarines are difficult due to the wave prorogation that occurs underwater versus in the air. Due to the density of water, radio waves do not travel as far (Matheson, 2018). However, two new technologies are being developed to solve this issue. First, university researchers have been developing quantum communications. Quantum communications do not have the same prorogation issues that degrade radio waves. This type of communication would not have any or minimal interference with smooth or turbulent water. Quantum communications technology is promising, however still in the early stages of development (Mizokami, 2020).
Another communication technology that could be an enabler is wireless communications that use sonar to prorogate signals to the surface of the water for an airborne sensor to read from an airplane (Matheson, 2018). This technology is not necessarily new; however, the application of sonar would be a new development. The application for the U.S. Navy would be to gather information from autonomous submarines during long extensive missions and provide command and control of these unmanned systems.
Artificial Intelligence has been a technology that continues to improve and ensure more autonomy for unmanned systems. The U.S. Navy is already developing this technology through DARPA with the Sea Hunter. The AI technology currently used is for single operations. However, they are continuing to develop a “swam” or cooperative behavior that would allow communications between unmanned systems to better patrol and navigate for months at a time autonomously (Congressional Research Service, 2020). The cost of utilization would be around $20,000 a day versus $700,000 a day for manned operations.
The Sea Hunter’s AI system is currently customizable for full autonomy, semi-autonomy, or human operators in the loop.
Figure 3. (O’Rourke, 2020)
The U.S. Navy’s transition to more and more unmanned systems will require a large investment in enabling technologies to ensure the success of the programs. While the enabling technologies are available, they are still in their infancy for deployment in water operations. The necessity for the Navy to continue to build combat power will remain with the Chinese investing millions in their Navy. The technology is only one aspect of the equation for unmanned systems. Command and control systems that are currently in place with the Navy will need to be revised and tested to ensure a distributed system will work in practice and during combat operations.
Only time will tell if the development of these different autonomous maritime vehicles will enable the future success of sea operations.
References
Congressional Research Service. (2020). Artificial Intelligence and National Security. Washington, D.C. : Congressional Research Service.
Larter, D. B. (2020, February 13). The US Navy is spending millions plotting the drone-enabled fleet of 2045. Retrieved from Defense News: https://www.defensenews.com/naval/2020/02/13/the-us-navy-is-spending-millions-plotting-the-drone-enabled-fleet-of-2045/
Larter, D. B. (2020, June 1). US Navy embraces robot ships, but some unresolved issues are holding them back. Retrieved from Defense News: https://www.defensenews.com/naval/2020/06/01/us-navy-embraces-robot-ships-but-some-unresolved-issues-are-holding-them-back/
Matheson, R. (2018, August 22). Wireless communication breaks through water-air barrier. Retrieved from MIT News: https://news.mit.edu/2018/wireless-communication-through-water-air-0822
Mizokami, K. (2020, April 22). Quantum Communication Could Make U.S. Subs Even More Deadly. Retrieved from Popular Mechanics: https://www.popularmechanics.com/military/research/a32225290/quantum-communication-submarines/
O’Rourke, R. (2020). Navy Large Unmanned Surface and Undersea Vehicles: Background and Issues for Congress. Washington, D.C.: Congressional Research Service.
Unmanned systems have been a popular term for the last decade with the commercialization of hobby drones (unmanned aerial vehicles) and autonomous cars and planes. However, the term unmanned system is somewhat vague as to the actually meaning of the phrase. An unmanned system is a vehicle or computer that autonomously completes an action without the assistance or interaction of a human being. This definition is also a little vague but begins to narrow down the functions of an unmanned system. However, this does not mean that an unmanned system completely removes the human from the equation. Generally, unmanned systems are operating with or concurrently with humans to ease task saturation or provide a service.
There are many different types of systems that are currently being explored to use this technology to include automobiles, aircraft, and boats. Each of these industries has there own abbreviations for its specific form of transportation. UAV stands for unmanned aerial vehicle and UGV stand for unmanned ground vehicles.
Being to understand the terminology of unmanned systems helps bring clarity and thought-provoking ideas to the applications and industries that would benefit from these systems.
I easily installed the system on my wife’s SUV, Nissan Rogue, without any issues. I mounted the front camera behind the rear-view mirror so it is out of the way and out of sight. The rear camera was installed on the back window using the supplied 3M double sided tape. It ended up coming down after a couple of days so I super glued it to the tape that was still attached to right above the window.
My new truck was about the same for the front window. The only issue with the back is the bed of the truck. I wanted to place the camera above my license plate to get the best view possible. Two issues arose.
The first was the supplied cabling for the rear camera was too short to route from the front camera to the back. Instead of splicing a cable together I ordered their extension cable (https://amzn.to/2BT8zWE). For the attachment to the license plate I decided not to look for solutions and create one.
The Build
First I took the measurements off an old license plate to get the dimensions for the bracket. The first measurement was the distance between each hole to mount the bracket. It measure around 177mm from center point to center point. I used the sketch feature in Fusion 360 to create the profile.
The first measurement was from center hole to center hole of the screw slots (177 mm).
Once i had these dimensions, I could settle on a design for the bracket. I wanted it to be offset to show the entire tag when viewed. So I offset the screw holds from the main bracket. I first made the boxes and use the fillet tool to curve the bottoms. I created a circle in the middle of each box to form the holes for the bracket. From there I made the top of the bracket using the square tool and created a rectangle that was about 12.5mm from the edge of the first two boxes. That made the total length about 234mm. The width was 30mm. Once it was drawn, I deleted the center line to create the offset.
Second measurement was the total length of the part I wanted to make (~235 mm)
All that was require next was the holes to mount the camera. I measured the bracket for the camera and it came out to be 32mm from center point to center point. So I got the midpoint of the bracket so far and drew a construction line for reference. I then created two circles that were 16mm from each side of the midpoint reference (construction) line.
Next was to position the camera mounting holes in the center of the piece (~117.5 mm) and ensure that they were 32 mm apart.
With that completed the bracket was ready to be extruded into three dimensions to print on the 3D printer. Prior to printing, I came up with an idea of how to secure the camera within the bracket itself with a nut. Once I extruded the sketch, I created a sketch on the top plane of the bracket. This allowed me to create a two dimension sketch to then cut away a pocket for both nuts.
The two nut pockets can be seen above to capture two M3
After that it was ready for printing. I used my only 3D printer the Creality Ender 3 (https://amzn.to/2NjEIMy). The setting will be below. Here are some of the pictures of the bracket installed. It worked perfectly. If you have any comments, please leave them below.
Final Product
Printed and in place!
The final product turned out great. Only time will tell on how long the PLA last in the dry Texas heat.
After recently moving into a smaller house, organization has been a necessity to ensure we can keep a clean and neat home. One of those organization projects was to organize our laundry room due its small space with zero storage. No where to place our detergents or laundry baskets. So the problem had to be solved, which is great giving me the excuse to do some woodworking while keeping my wife happy! Win-win!
For this project, I will be walking through the steps of designing and building a laundry basket holder with shelves to accommodate our storage requirements, while keeping it organized.
Design & Requirements
The requirements for this project are dependent on the necessity. Our laundry room is a very small room with barely enough room for a small metal shelf and a laundry basket. So I started brainstorming on the solution. My brother-in-law has a fairly large laundry room and built a floor to ceiling laundry basket holder to separate clothing. This helped with the inspiration of my design along with some quick internet searches for other designs. Check out Ana White’s design that follows a similar design that I drafted. My requirements were that it holds at least two baskets, provides at least one shelve for storage, and fits within my limited space.
First I hand draw my projects. Then I use Sketchup to make a more precise cut list.
My first design (hint..hint) was to hold three baskets and one shelve on the top. I first sketched the design in my project notebook to get a rough idea of the look and the proportions. I feel like this is a fast and easy way to bring an idea from mind to reality without having to worry about the exact dimensions. After I got the general sketch, I took dimensions of my laundry baskets and of the area that the shelving would go. This help bring scale to my drawing while still keeping it simple.
Once I got the initial design sketched out with rough dimensions, I turned to my computer to determine the exact dimensions to develop my material list and cut list. Doing this before cutting or purchasing the material helps save time and money! This also helps with proportions of the overall project.
First design.
Gathering Project Materials
After getting my material list prepared on the computer, a quick run to the home store is required to gather the materials and consumables. Some of the materials and tools can be substituted depending on tool availability. For example, mending plates and L-brackets can replace the pocket holes to assemble the frame. I used the mending plates in one portion of my frame due to a mistake in the fabrication process (See below for an example picture).
Coffee is a must!
Below are the materials and tools required to complete this project.
Using the cut list from Sketchup, I cut the frame and support members from those three boards. First, I cut all the stock down to rough dimensions on the miter saw to make it easier to cut on the table saw. Then I cut them to width on the table saw to 2 1/2 inches.
Cut list for the project.
The boards that I bought from the home store were discounted due to damage and warping. To mitigate bowing of the frames, I used my table saw to edge joint the boards. I learned this method from Jimmy Diresta after watching his “Ask this Old House” YouTube video.
Discount Lumber from the Home Store
The method to joint the edges of the board on the table saw is to flip the piece of wood during each cut to slowly reduce the amount of unevenness of the edge until the edge is square. While cutting the boards the goal is to take off a little at a time to reduce the amount of waste of each board. This worked better than I thought. As you can see from the pictures above it eliminated the gap completely from my top shelve. Quite a difference.
Before
After
After the edges were straight enough, I cut all frame stiles, rails, and support members to size on the table saw and miter saw.
Lumber was cut per the cut list.
Tip #2: If you don’t own a table saw, you can by dimensional lumber in the correct widths at the home store. This will alleviate the need for a table saw to rip the pieces to size. All that would be required is to cut the pieces to length on a miter saw or circular saw. Just ensure the boards are not warped along the length.
Cut List:
Frames
Four (4) 3/4″x2.5″x43″ pine boards (Outside Stiles)
Four (4) 3/4″x2.5″x23″ pine boards (Rails)
Two (2) 3/4″x2.5″x38″ pine boards (Inside Stiles)
Horizontal Support Members
Four (4) 3/4″x2.5″x18″ (horizontal support members)
Assembling the Frames & Design Confirmation
Once the boards were cut to final size, I began assembling the left and right frames that will be the main structure of the laundry basket cabinet.
Mending Plates
Pocket Holes
The primary means of assembling the rails (horizontal members) and stiles (vertical members) were by pocket hole screws. I used the Kreg Pocket Hole Jig to create the pockets on all the rails and the middle stile. This worked fairly easily. However, one frames middle stile didn’t take the screws very well. So, to fix the issue I used a mending plate to attach the middle stile (See picture above). You can use mending plate to attach the entire frame assembly instead of using pocket holes.
Finished the rails and stiles for each side.
After the basic frames were constructed, I assembled the whole cabinet to verify the position of each laundry basket shelf and the top shelve. I used clamps to hold everything in place to show my wife and get the approval to continue.
Test Fit with Clamps.
Her strong recommendation was to eliminate the top laundry basket shelve and replace with a normal shelf for more storage. So I redesigned the cabinet to account for the secondary shelve. I took measurements of the location of each shelving rail and dissembled the cabinet to secure the shelving rails to the frames.
Finished the sides with the rails for the baskets and shelf.
Tip #3: If you don’t have a pocket hole jig or don’t want to purchase one, mending plates can be used to assemble the side frames and L-brackets can be used to assembly the side frames to the horizontal support members on the top and bottom.
Preparing for Finishing
After completely assembling the the side frames with the shelve railing in place, I filled all the pocket holes with wooden dowels and a few pocket hole plugs. This will hide the construction techniques and make it look more professional. I also filled the screw holes and any imperfections with wood filler to hide all the screws and defects in the wood. Once everything dried, I flush cut all the wooden dowels and sanded down both frames to prepare for finishing.
Filling Pocket Holes with Dowels
Filled the Defects with Wood Putty
Filled the Screw Holes with Wood Putty
Before Sanding (Left) & After Sanding (Right)
I first used 100 grit sand paper to remove the bulk of the high spots and left over material from the wood dowels and wood filler. After that was completed I used 150 to make everything smooth. Now the frames and top are ready for finishing.
Final Assembly & Finishing
Now that everything is ready to be painted, I assembled everything today except the top. This ensures that the glue bonds to the horizontal support members and makes painting easier. Since the base of the cabinet will be painted white, I applied the first coat of paint and let set for a couple of hours until it was completely dry. Then I lightly sanded with 220 to remove any high spots and bubbles in the paint. Make sure you wipe the area with a clean rag to remove any dust and debris from the cabinet. I applied two additional coats of paint to ensure the durability of the paint was adequate for its use.
Painted & Stained
For the top, I ensured all dust and debris was removed from the surface and applied a sanding sealer to ensure the stain would be applied evenly throughout the wood. This gives the wood stain a consistent color throughout the wood grain. I applied two coats to get the desired color, sanding between each coat. After the stain completely dried, I applied wipe-on polyurethane to make the wood shine and apply some protection. You can substitute with wood polish for a little less protection but easier application.
I am on a quest to build my own Computer Numeric Control (CNC) Machine. It has been a pursuit of mine for the last three years. I have attempted on some machines only to get to a hurdle that I just give up. However, it is my only priority for the next few months.
To start things off, I am building a dedicated stand as a base for my CNC machine, which will be the Mostly Printed CNC by V1 Engineering. Click the link for information about this machine.
Overall Design
The Design
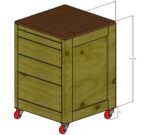
The design of this tool cabinet will be using 2x4s and plywood for a cost effective project for shop furniture. The 2x4s will be used to make the side panels using rails and stiles with a plywood inset. Then 4 stretchers will be used to connect the two side panels together to create the basic cabinet. Once built the cabinet drawers will be made and placed. My design calls for four main drawers (Two medium and two large). It also has a bits tray at the very top to store…well bits for the CNC.
The Build: Side Panels
To start this build the side panels need to be made since there are the major of the cabinet frame. I bought 2x4s from my local home store. While picking my stock at the store I was looking for the straights and tightest grain I could find. The tighter the rings on the wood the stronger the wood will be.
First, I cut down the 2x4s to get to the rough dimensions required for my plan. I cut it about an inch or two long. This is to account for any human error at this point or possible snipe once I start planing down the material.
Measuring the stock
Getting ready to plane down
After Planing
Planing down the edges on the table saw
Side Panel Rails and Stiles
After all the 2x4s are cut down to a rough size, I planed down the 2x4s to get rid of the rough sides and rounded edges. This step is completely optional and does not add any strength or benefit in the final product besides cleaning up the face of the wood.