So, today swimming is cancelled! Well at least it isn’t by choice. This morning I woke up to many canceled classes for school, and the only reason to go to the university was to go swimming. So, this would be one of the highlights of my day today. I was getting some excellent exercise and stretching out my legs in the pool. All was well when I left home. I ran into some heavy traffic on my way to the university pool, but all was well. I was enjoying my audiobook and looking forward to the swim.
Once I got to the parking garage, I enjoyed my audiobook on the walkover. Finally, I got to my locker and got ready for my workout. As I walked to the pool, the staff had closed the pool until further notice due to unforeseen maintenance issues. So, I had gotten up early and drove to my school only to do one thing, swim, and now it is closed. What a wonderful day! So I guess I’ll try again tomorrow, but I’ll check the website before I leave the house.
Key Takeaways:
Check the pool website to make sure it is open! (Not sure if it would have stated this morning)
Sometimes rest days are placed upon you not scheduled! Enjoy the day!
After the great race yesterday, today I chose to do a nice recovery run with my dog, Piper. The schedule had an easy run and I felt pretty good to go at a nice slow pace. So we went running!! Our average pace was 14:01 minutes per mile. Not to bad for Piper, who doesn’t run with me often. We ended up running for about 42 minutes right at 3 miles. I’m still going to be training next week, but it will be at an easier pace for recovery.
Key Takeaways:
Nice slow runs are nice to enjoy nature and the scenery!
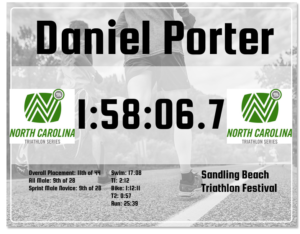
Today is the day where all the training will give me a baseline of what I can do in an actual race. The goal for today’s triathlon is to complete the Sprint in a goal time of 2:15:00. The reasoning behind this is my standard training times for each event: 20 minutes for the swim (2:40 min/100 yards), 1:20:00 for the bike, and 35 minutes for the run (11:17 min/mile). This goal is due to not ever doing a triathlon before, and I didn’t know what I would feel like during each event since I have never done them in a single session. Also, the bricks I have completed have only been the bike to run. Therefore, I wanted to have an easily achievable goal. However, I did have a stretch goal of 2:00:00 to give me a guide if I was doing better than I planned.
Preparation
The preparation the night prior was vital for my family and me. We had an hour of travel early in the morning, and I wanted to make it as stress-free and easy as possible. So I cleaned my truck inside and out on Friday. I installed my bike mounting kit for the bed of my truck. I also got a clean plastic container and put all my cycling gear in with my race packet to ensure all was there. I also packed a bag of clothes to change into after the race and included spare race pants and a shirt in case of a wardrobe malfunction. Everything was loaded in my truck on Friday night, except for my bike.
This was key to minimizing the stress on myself and my wife. It went smoothly. The only issue I ran into the morning was placing the race sticker on my bike before leaving. This was a mistake because the morning moist air was starting to rip it off, and I had to pull over to remove it. Not a big deal, just a lesson learned. We got to the course about an hour before the start. I parked and got my bike set up in my rack, which happened to be next to the bike start. Once everything was set in the transition area, my wife learned to better prepare for herself and my daughter. They had a lot of losing items without a bag. She ended up using the plastic container to carry around their stuff.
Swim
So for the race, I entered as a novice and was the last wave to start. I was very relaxed, and I planned to finish the race. Most importantly, have some fun. So at 8:18 AM, the race began with the swim. My game plan for the swim was to let everyone swim ahead of me, and I would bring up the rear. I started the swim with this was the plan, but it seemed that I was swimming faster than many other people. I was slowly passing people and didn’t realize this till I stopped the swim. In the beginning, I thought I was going to drown because this was my first open water swim, and I couldn’t get in a rhythm for my strokes. But, after the first 250 meters, I started to get in a good rhythm and pace. The following 500 meters was pretty fun. I exited the water at 00:17:08, about 3 minutes faster than what I had planned. This realization made me feel good with all the swim work I have been doing.
Transition 1 (T1)
As I was running to the transition area, I tried to ensure I ran and didn’t walk. So I had a reasonable distance to go to get to my bike. I have never practiced my transition 1 (T1), so I tried to go as fast as possible. I thought I was moving pretty quickly, but there are some areas to improve definitely. My transition time was 2:11. I opted to put my socks and shoes on before leaving the transition area. This was a good choice for me.
Bike
The bike was a bit tougher than I wanted it to be. The course was very hilly, but overall I am pretty satisfied with my overall performance. I didn’t have any issues with the course or my bike. I completed the bike in 1:12:11, about 8 minutes faster than my primary goal of 1:20:00. By the time I got to the dismount point, I was excited to move to the next event. At this point, I realized that I could meet my stretch goal of 2 hours or sub-2 hours. In addition, I gained some insight on improving my bike time; if I can get sub 1:00:00, I will gain a lot for the next race.
Transition 2 (T2)
The second transition was a non-event. As I approached the dismount line, I started to undo my shoes and slip out, but my shoes tried to unclip. So I opted to keep them on and run into the transition with them. It wasn’t a terrible decision. In the transition, I kicked off my shoes, grabbed my running belt, and threw my shoes on. I did have elastic laces, and this made it seamless. My total T2 time was 57 seconds.
Run
The run was tiring and felt a bit difficult, which is what I expected. That is why I planned on a 35-minute goal. Luckily, the total distance was 3.1 miles because I was feeling every step. As I continued my run, I kept checking my watch, and if I kept on the pace, I would blow my goals out of the water. Toward the end of the run, I started to get a cramp in my right side near my abdomen. I just stayed focused and pushed through the discomfort.
Finish
In the final few hundred yards, I was able to pass two people and finished my first triathlon at 1:58:06, far exceeding my original goal of 2:15:00 and my stretch goal of 2:00:00. This experience has been gratifying. My wife and daughter were extraordinarily supportive and cheered me on at every transition. It was indeed a great experience. I would recommend this to everyone. Set a physical training goal and go to a race where everyone there is racing against themselves and, of course, others.
Training Statistics:
Strava Results
Elapsed Time
Moving Time
Distance
Average Speed
Max Speed
Elevation Gain
Calories Burned
01:59:41
hours
01:58:42
hours
23.87
mi.
12.07
mph
33.33
mph
996.39
ft.
1,438
kcal
Didn’t stop my watch in time. But the official time is in the header.
https://runsignup.com/Race/Results/68235/IndividualResult/DBMp#U52113139
Today I’ll be taking the day off in preparation for the upcoming race this weekend. I am tapering my workouts to help with any soreness or fatigue. Also, my work was very time consuming for me to workout. So it is a good excuse to taper for the race! My next post will be my race results and summary!!! See you then!!
The routine scheduled for today is a 3km time trail. It starts with 15 minutes of various heart rate runs for the warmup followed by the 3km time trial. The workout ended with a cooldown of 5 to 10 minutes. I got up and just took off for the run. I started with the 15 minutes of warmup. Then stepped up my pace for the 3km trial run. I didn’t feel that great for this run benchmark and didn’t do as well as I would have like to do. There is always next time. I averaged 10:42 min/miles.
Key Takeaways:
When you have a bad day, just move on and don’t dwell on it.
There is always another day to set a personal record.
Today’s swim is a tempo swim in preparation for the race on Saturday. The workout is one of the longest distances at 1,640 yards. The routine consisted of a warmup of 200 yards followed by five repetitions of 50 yards of freestyle stroke with 10-second rest. Then a steady-state swim for 850 yards followed by a 1-minute rest. The cooldown was 200 yards. The primary purpose of this workout was to ensure I could swim the entire length of the triathlon race and build confidence in myself. The morning started a bit normal and a little behind schedule; however, I had a reasonable amount of time to complete my workout without any issues.
In the 200 yards of the warmup, I did 50 yards of freestyle and 50 yards of backstroke. For the last 100 yards, I used fins for the first time to strengthen my legs and to practice the technique. After the warmup, I used the five reps of 50 yards to work on speed and improve my speed. This was very tiring and a challenge. For the steady 850 yards, I focused on lowering my cadence and heart rate to get to a comfortable pace with regular breathing. This was a good exercise in managing and pacing myself. I found myself with plenty of energy and could have gone longer if I needed it. This was a significant boost to my confidence in finishing the swim. The cooldown was a non-event. I just did 100 yards of freestyle and 100 yards backstroke.
Key Takeaways:
Swim your race distances or further to build confidence!
Practice relaxing and managing your pace when your HR is high.
I started this section of my blog as a timeline for my training for my first Triathlon. Competing in a Triathlon has been a goal of mine for the last seven years. However, due to many unforeseen circumstances and ever-growing work requirements, I haven’t been able to compete in a triathlon. Now I am at a point in my professional career that I now have a little bit of free time to train again. So, I am currently training for the Sandling Beach Triathlon held in North Carolina at the beginning of October!
To start this blog series, I have recapped how I became interested in the sport of Triathlons and how I got to this point. If you aren’t interested in my story below, no hard feelings, and take a look at my latest post!
The Beginning
It started when I was learning how to fly helicopters in Enterprise, Alabama. The local Army base was hosting a Sprint Triathlon in the Fall of 2014. So my friend and I started to train for the event a couple of months out. I bought my bike, which was a Trek 1.1 road bike, in 2013, and we hit the pool about twice a week.
However, due to work requirements, we were unable to compete. The goal of completing a Triathlon was still in my sights. Unfortunately, my new work requirements began to pile up, and my responsibilities as an adult did not leave much time for triathlon training. In 2015, I was given another opportunity to compete in a Reserve Sprint Triathlon in South Korea. The timing and structure of the course were perfect. A reserve triathlon is a run, bike, and swim. Whereas a traditional triathlon is a swim, bike, and run. The night of the Triathlon, I gathered all my gear near the door and excitedly tried to sleep!
Around 1 AM, I was abruptly awoken by the phone going off. My supervisor informed me that one of my subordinates was picked up by the police and hospitalized for alcohol poisoning. As the manager, my weekend was ruined by ensuring he was in good health and completing a mountain of paperwork. Once again, another triathlon attempt was foiled by unforeseen circumstances.
At this point, my hopes for completing a triathlon was dwindling, and my motivation was waning. However, during my work performance reviews, I always put completing a triathlon as one of my personal goals. Fast forward to today, I am currently in a position where my free time has dramatically increased, and my motivation to compete in the upcoming Sandling Beach Triathlon is at an all-time high!
As of writing this article, I have been training steadily for about three weeks. My fitness is not where it was seven years ago, but I think that will be the best part of the challenge to get back to the point I was fitness-wise.
This series will chronicle my journey through training, dieting, and finally completing a triathlon!
The United States Navy has invested in numerous autonomous maritime vehicles throughout the years and plans on extending its capabilities to a larger scale. The Navy requested $579.9 million for FY21 to fund three different categories of the unmanned vehicles. These categories are defined as Large Unmanned Surface Vehicles (LUSV), Medium Unmanned Surface Vehicles (MUSV), and Extra-large Unmanned Undersea Vehicles (XLUUV) (O’Rourke, 2020).
Figure 1. (O’Rourke, 2020)
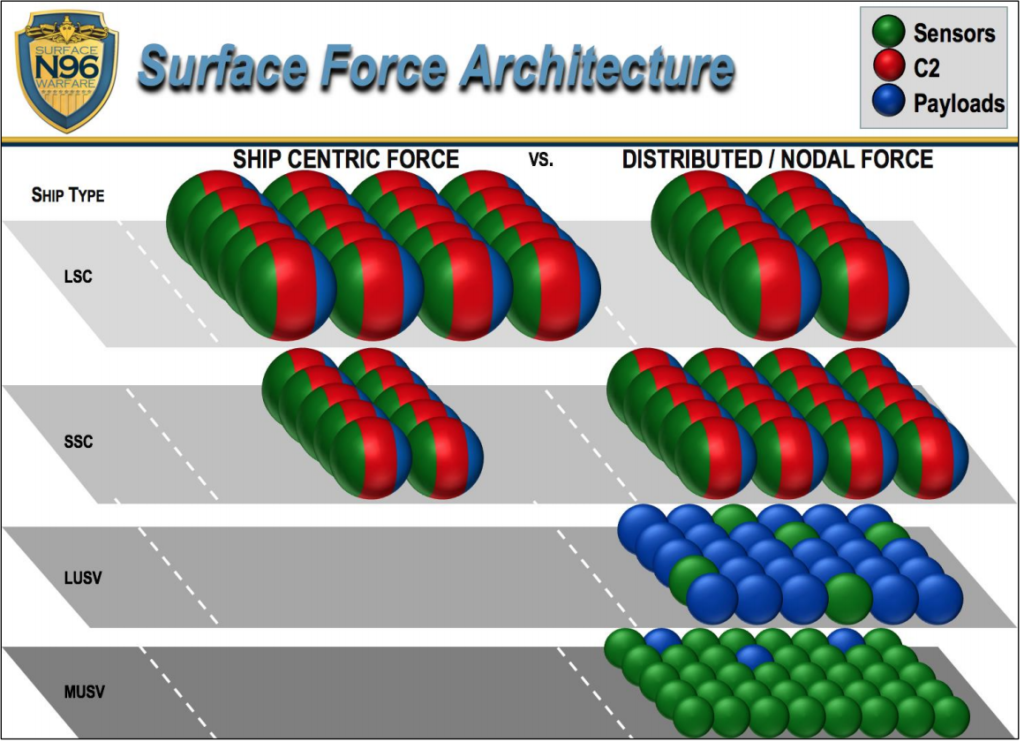
The capabilities of each of these categories of maritime systems would be used to help retain the United States Naval capabilities while Chinese naval spending increases (Larter, 2020). As the Navy begins to look at more and more unmanned capabilities the organization would have to change the structure of the Naval Force. Currently, the architecture the Navy uses is for large scale manned operations and vehicles with small unmanned systems for sub-hunting and mapping. However, this change in larger-scale unmanned systems would require the organization to change its command and control platforms and procedures (Larter, 2020).
The figure below is a visual representation of the difference for the current ship-centric force and the distributed / nodal force that the Navy would use with more unmanned maritime systems (O’Rourke, 2020).
Figure 2. (O’Rourke, 2020)
The movement to a more distributed force has been difficult to obtain due to the technology gap. However, with new advancements with underwater communications and artificial intelligence.
Underwater communications with ships and submarines are difficult due to the wave prorogation that occurs underwater versus in the air. Due to the density of water, radio waves do not travel as far (Matheson, 2018). However, two new technologies are being developed to solve this issue. First, university researchers have been developing quantum communications. Quantum communications do not have the same prorogation issues that degrade radio waves. This type of communication would not have any or minimal interference with smooth or turbulent water. Quantum communications technology is promising, however still in the early stages of development (Mizokami, 2020).
Another communication technology that could be an enabler is wireless communications that use sonar to prorogate signals to the surface of the water for an airborne sensor to read from an airplane (Matheson, 2018). This technology is not necessarily new; however, the application of sonar would be a new development. The application for the U.S. Navy would be to gather information from autonomous submarines during long extensive missions and provide command and control of these unmanned systems.
Artificial Intelligence has been a technology that continues to improve and ensure more autonomy for unmanned systems. The U.S. Navy is already developing this technology through DARPA with the Sea Hunter. The AI technology currently used is for single operations. However, they are continuing to develop a “swam” or cooperative behavior that would allow communications between unmanned systems to better patrol and navigate for months at a time autonomously (Congressional Research Service, 2020). The cost of utilization would be around $20,000 a day versus $700,000 a day for manned operations.
The Sea Hunter’s AI system is currently customizable for full autonomy, semi-autonomy, or human operators in the loop.
Figure 3. (O’Rourke, 2020)
The U.S. Navy’s transition to more and more unmanned systems will require a large investment in enabling technologies to ensure the success of the programs. While the enabling technologies are available, they are still in their infancy for deployment in water operations. The necessity for the Navy to continue to build combat power will remain with the Chinese investing millions in their Navy. The technology is only one aspect of the equation for unmanned systems. Command and control systems that are currently in place with the Navy will need to be revised and tested to ensure a distributed system will work in practice and during combat operations.
Only time will tell if the development of these different autonomous maritime vehicles will enable the future success of sea operations.
References
Congressional Research Service. (2020). Artificial Intelligence and National Security. Washington, D.C. : Congressional Research Service.
Larter, D. B. (2020, February 13). The US Navy is spending millions plotting the drone-enabled fleet of 2045. Retrieved from Defense News: https://www.defensenews.com/naval/2020/02/13/the-us-navy-is-spending-millions-plotting-the-drone-enabled-fleet-of-2045/
Larter, D. B. (2020, June 1). US Navy embraces robot ships, but some unresolved issues are holding them back. Retrieved from Defense News: https://www.defensenews.com/naval/2020/06/01/us-navy-embraces-robot-ships-but-some-unresolved-issues-are-holding-them-back/
Matheson, R. (2018, August 22). Wireless communication breaks through water-air barrier. Retrieved from MIT News: https://news.mit.edu/2018/wireless-communication-through-water-air-0822
Mizokami, K. (2020, April 22). Quantum Communication Could Make U.S. Subs Even More Deadly. Retrieved from Popular Mechanics: https://www.popularmechanics.com/military/research/a32225290/quantum-communication-submarines/
O’Rourke, R. (2020). Navy Large Unmanned Surface and Undersea Vehicles: Background and Issues for Congress. Washington, D.C.: Congressional Research Service.
After recently moving into a smaller house, organization has been a necessity to ensure we can keep a clean and neat home. One of those organization projects was to organize our laundry room due its small space with zero storage. No where to place our detergents or laundry baskets. So the problem had to be solved, which is great giving me the excuse to do some woodworking while keeping my wife happy! Win-win!
For this project, I will be walking through the steps of designing and building a laundry basket holder with shelves to accommodate our storage requirements, while keeping it organized.
Design & Requirements
The requirements for this project are dependent on the necessity. Our laundry room is a very small room with barely enough room for a small metal shelf and a laundry basket. So I started brainstorming on the solution. My brother-in-law has a fairly large laundry room and built a floor to ceiling laundry basket holder to separate clothing. This helped with the inspiration of my design along with some quick internet searches for other designs. Check out Ana White’s design that follows a similar design that I drafted. My requirements were that it holds at least two baskets, provides at least one shelve for storage, and fits within my limited space.
First I hand draw my projects. Then I use Sketchup to make a more precise cut list.
My first design (hint..hint) was to hold three baskets and one shelve on the top. I first sketched the design in my project notebook to get a rough idea of the look and the proportions. I feel like this is a fast and easy way to bring an idea from mind to reality without having to worry about the exact dimensions. After I got the general sketch, I took dimensions of my laundry baskets and of the area that the shelving would go. This help bring scale to my drawing while still keeping it simple.
Once I got the initial design sketched out with rough dimensions, I turned to my computer to determine the exact dimensions to develop my material list and cut list. Doing this before cutting or purchasing the material helps save time and money! This also helps with proportions of the overall project.
First design.
Gathering Project Materials
After getting my material list prepared on the computer, a quick run to the home store is required to gather the materials and consumables. Some of the materials and tools can be substituted depending on tool availability. For example, mending plates and L-brackets can replace the pocket holes to assemble the frame. I used the mending plates in one portion of my frame due to a mistake in the fabrication process (See below for an example picture).
Coffee is a must!
Below are the materials and tools required to complete this project.
Using the cut list from Sketchup, I cut the frame and support members from those three boards. First, I cut all the stock down to rough dimensions on the miter saw to make it easier to cut on the table saw. Then I cut them to width on the table saw to 2 1/2 inches.
Cut list for the project.
The boards that I bought from the home store were discounted due to damage and warping. To mitigate bowing of the frames, I used my table saw to edge joint the boards. I learned this method from Jimmy Diresta after watching his “Ask this Old House” YouTube video.
Discount Lumber from the Home Store
The method to joint the edges of the board on the table saw is to flip the piece of wood during each cut to slowly reduce the amount of unevenness of the edge until the edge is square. While cutting the boards the goal is to take off a little at a time to reduce the amount of waste of each board. This worked better than I thought. As you can see from the pictures above it eliminated the gap completely from my top shelve. Quite a difference.
Before
After
After the edges were straight enough, I cut all frame stiles, rails, and support members to size on the table saw and miter saw.
Lumber was cut per the cut list.
Tip #2: If you don’t own a table saw, you can by dimensional lumber in the correct widths at the home store. This will alleviate the need for a table saw to rip the pieces to size. All that would be required is to cut the pieces to length on a miter saw or circular saw. Just ensure the boards are not warped along the length.
Cut List:
Frames
Four (4) 3/4″x2.5″x43″ pine boards (Outside Stiles)
Four (4) 3/4″x2.5″x23″ pine boards (Rails)
Two (2) 3/4″x2.5″x38″ pine boards (Inside Stiles)
Horizontal Support Members
Four (4) 3/4″x2.5″x18″ (horizontal support members)
Assembling the Frames & Design Confirmation
Once the boards were cut to final size, I began assembling the left and right frames that will be the main structure of the laundry basket cabinet.
Mending Plates
Pocket Holes
The primary means of assembling the rails (horizontal members) and stiles (vertical members) were by pocket hole screws. I used the Kreg Pocket Hole Jig to create the pockets on all the rails and the middle stile. This worked fairly easily. However, one frames middle stile didn’t take the screws very well. So, to fix the issue I used a mending plate to attach the middle stile (See picture above). You can use mending plate to attach the entire frame assembly instead of using pocket holes.
Finished the rails and stiles for each side.
After the basic frames were constructed, I assembled the whole cabinet to verify the position of each laundry basket shelf and the top shelve. I used clamps to hold everything in place to show my wife and get the approval to continue.
Test Fit with Clamps.
Her strong recommendation was to eliminate the top laundry basket shelve and replace with a normal shelf for more storage. So I redesigned the cabinet to account for the secondary shelve. I took measurements of the location of each shelving rail and dissembled the cabinet to secure the shelving rails to the frames.
Finished the sides with the rails for the baskets and shelf.
Tip #3: If you don’t have a pocket hole jig or don’t want to purchase one, mending plates can be used to assemble the side frames and L-brackets can be used to assembly the side frames to the horizontal support members on the top and bottom.
Preparing for Finishing
After completely assembling the the side frames with the shelve railing in place, I filled all the pocket holes with wooden dowels and a few pocket hole plugs. This will hide the construction techniques and make it look more professional. I also filled the screw holes and any imperfections with wood filler to hide all the screws and defects in the wood. Once everything dried, I flush cut all the wooden dowels and sanded down both frames to prepare for finishing.
Filling Pocket Holes with Dowels
Filled the Defects with Wood Putty
Filled the Screw Holes with Wood Putty
Before Sanding (Left) & After Sanding (Right)
I first used 100 grit sand paper to remove the bulk of the high spots and left over material from the wood dowels and wood filler. After that was completed I used 150 to make everything smooth. Now the frames and top are ready for finishing.
Final Assembly & Finishing
Now that everything is ready to be painted, I assembled everything today except the top. This ensures that the glue bonds to the horizontal support members and makes painting easier. Since the base of the cabinet will be painted white, I applied the first coat of paint and let set for a couple of hours until it was completely dry. Then I lightly sanded with 220 to remove any high spots and bubbles in the paint. Make sure you wipe the area with a clean rag to remove any dust and debris from the cabinet. I applied two additional coats of paint to ensure the durability of the paint was adequate for its use.
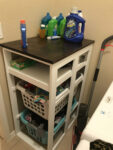
Painted & Stained
For the top, I ensured all dust and debris was removed from the surface and applied a sanding sealer to ensure the stain would be applied evenly throughout the wood. This gives the wood stain a consistent color throughout the wood grain. I applied two coats to get the desired color, sanding between each coat. After the stain completely dried, I applied wipe-on polyurethane to make the wood shine and apply some protection. You can substitute with wood polish for a little less protection but easier application.